And here it is in it's new space...
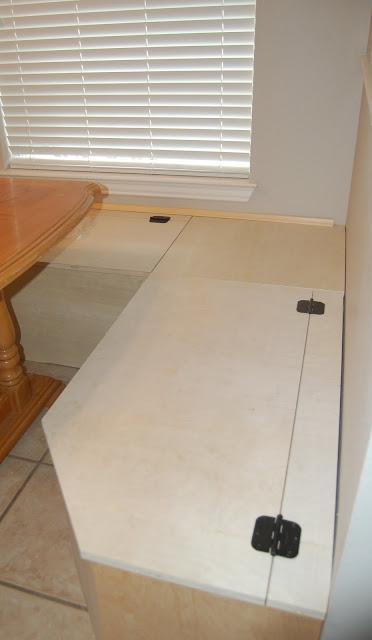
These pictures are before hinges were installed, as the tops will lift up for storage.
Here's a reminder of the space before...
And after...
Hubby went out of town this weekend, but before he left, I talked him into installing the hinges. Not sure if these will stay, I would really like to find some that are hidden. The guy at Lowe's told me these were the only ones that would work for what we're doing. I've searched the internet since then and I'm not convinced this is my only option.
Do any of you know if concealed hinges will work?
Hopefully we'll be trimming out the banquette and adding base molding tomorrow. I'm so excited to see it all come together! Surprisingly, it gives us more space to walk around, I didn't realize just how much space those chairs took up until they were gone.
While hubby's been away, I've been busy making a cute ruffled pillow I saw on Mimi's blog, Blue Roof Cabin. She gives a great tutorial on this and I decided to try it! We've needed an extra accent pillow on our master bed for some time now. I took some cloth napkins (a wedding gift from 11 years ago) and used them for my fabric.
I trimmed the fringes off and cut 2 napkins 13x17, as my pillow insert is 12x16. I had four napkins to work with and put two aside for the ruffled center. I cut two napkins 6 inches wide and 22 inches long to make two long strips. After sewing the sides to make a nice hem, I sewed them together to make a long 40 inch strip.
Once I had the two strips of fabric sewn together, I lined up my strip to the middle of the top piece and pinned the center.
The next step is to randomly pleat the center fabric, pinning down each pleat.
Once you've pleated and pinned, sew each side about 3/4" inside the finished edge. This will create a ruffled edge with your pleats down the middle. Place good sides together and sew all around (about 1/2"), leaving an opening to stuff your pillow.
Hand stitch the opening and you're done!
I just love it! It's the perfect addition and the color works great with the bedding!
Thanks to Mimi for the awesome tutorial!
Check out her blog and see what else this talented lady can do! She's very handy when it comes to building furniture! I'll be back soon to show another update on the banquette!
I'm linking up to:












11 comments:
Awesome job on the pillow and thank you so much for the shout out! The banquette is looking great! I can't wait to see the finished product!
Thanks for this tutorial. Husband wants one of these.
Alicia,
I just love your new kitchen banquette! You have a talent for design. Enjoy your home renovations.
I love it! Why wouldn't piano hinges work? We used to have a really long seat just like this in front of a window. The hinge was a piano hinge and it worked just fine.
OMG!!!!!!!!!!!!!!! Look at you go!!! It looks awesome!! I can't wait for my butt to try it out.
Your blog looks AWESOME!!! Girl you rock!! I'm so excited for you!! Can't wait to see more!!
Yes I was going to suggest a piano hinge as well. I have a storage ottoman my grandaddy built for me and he used a piano hinge for the top.
Good re-use of wedding gift napkins. Thanks for the show and tell.
Piano hinges might work, if it's not too much weight. You could also just cover them by having a removable cushion. It'd be more comfortable anyway.
What a great job on the pillow~ and your banquette is looking wonderful! Thanks for sharing this at FNF :)
I am so impressed with you both. Love the storage on the banquette. I am a new follower from the Creative Bloggers' Hop. Vicky @ www.messforless.net
Thanks for rocking the Creative Bloggers' Party & Hop with all your awesome posts. Hope you'll continually join us in the weekly party :)
Post a Comment