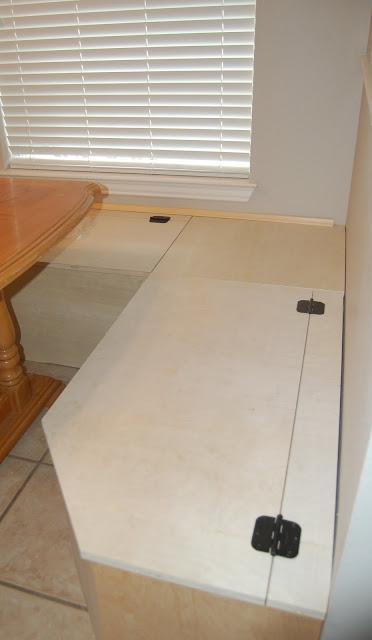
Hi everyone! We had an accident with the Mac on Friday, so I'm on hold regarding updates on the banquette. What I can tell you is that we have finished all the trim, filled the holes and are ready to prime. Priming and painting may not happen until next week, as I will be hosting 12-15 girls for my daughter's 6th birthday this Saturday. I can't wait to show you the party decorations I've been working on all week.
While Mr. Mac has been out of commission, I've been VERY productive around here! I must admit, I often spend too much time blogging, pinning and facebooking and will be a better manager of my time once he returns. Thankfully, my hard drive is fine and pictures taken during the process have not been lost!
I'm looking forward to sharing some pictures very soon! I hope you're having a great week!
Wednesday, July 20, 2011
Thursday, July 14, 2011
Coo-Coo for Craigslist PART 2 + Banquette Update!
Hi! I'm back with pictures of our new addition and an update on the banquette. You'll have to forgive the quality of some of these photos. I'm still learning how to use my Nikon D40 and hope to take a class soon!
As I mentioned in yesterday's post, I found a beautiful dresser made by Drexel Heritage. I'm just tickled with how it looks after some conditioning oil... now she shines! It also helped with hiding those minor scratches too!
So, without further ado, here is my 55 dollar dresser - gotta love the price for this beauty!
Isn't she gorgeous? I still can't believe it worked out, considering all the people that wanted her! Sorry about the angle on this one, we temporally moved it upstairs to the game room and the pool table prevented me from taking a good shot.
Bear with me, there's quite a few pics in this post!
Just look at those legs! Need I say more?
Such a classic piece! The previous owner said it's 30+ years old! She's got good bones!
She has a few imperfections on the top (coffee ring, dings, scratches, etc.), but I hope to sand the top down and re-stain it, maybe a darker tone to compliment the details on the legs. I've also considered painting it, but she's so pretty how she is, I think I'll keep her like this for awhile! My plan is to (some day) use this dresser in the living room as a television console. I've seen how Sarah showcases her lovely piece (I think ours look very similar) and I'm loving the 9-drawer storage!
Now on to the kitchen banquette progress...
Hubby and I added the base molding and trim last week and it gives it a whole new look!
Here's before the molding...
and after!
He even cut openings to help open the lids! My man thinks of everything!
Inside detail...
base molding
We're bummed about this lid. See the gap? It's warped! How does 1-inch plywood warp??? We have extra wood to cut another one, but we've decided (for now) that we'll see if it settles on it's own.
Now all we have left is to frame the center, add trim behind the hinges (against the wall) and PAINT!
Oh, wait! I have to sew cushions too! Doh! Okay, so there's still a lot to do, but we are really enjoying the extra storage, seating and new look it gives our kitchen! Again, sorry for all the pictures, I just couldn't resist showing you every angle! :) Until next time...
I'm linking up to Miss Mustard Seed's Furniture Feature Friday
and
Wednesday, July 13, 2011
I'm Coo-Coo for Craigslist!
Hi everyone! Just wanted to say thank you for all the suggestions on the banquette hinges. I haven't quite decided what I'm going to do. After living with it for a few days, I'm kinda lovin' the exposed ORB hinges, they give it character! The trim and base molding was added the other day and it has given it a totally different look. I'm beyond excited to paint and make cushions for our new addition.
Speaking of new additions... I scored an amazing find tonight! Just an hour after it was listed, I called this lady about her, wait for it... DREXEL HERITAGE LOW-BOY DRESSER! Woo-hoo! This is a beautiful piece! SO glad I called when I did, because as I was driving to see the piece, she told me two people had inquired about it! Then after I left, (paying for it and picking up later) she had received 8 more emails about it! A few even wanted to buy it sight unseen! I've missed out several times when it comes to treasures on Craigslist, so I knew with a little patience, my time would come, I just didn't expect it to be so soon! It has it's usual wear and tear, but after a little love with some Old English, she is looking fantastic!
I'm so excited to show you some pictures, but being that it's very late (almost midnight), I'll be posting some tomorrow... better lighting, to show you the gorgeous details! I've also taken some pictures of the banquette with it's new molding.
Stay tuned... it's worth the wait! :)
Saturday, July 09, 2011
Banquette Update + DIY Ruffled Pillow
I'm happy to show you some updates on the kitchen banquette my dh has been building for us! He's done an awesome job so far. I love his attention to detail! We moved it into the kitchen a few days ago and I have to say, I LOVE how it looks in the space. We have a long way to go, as trimming, painting and sewing cushions still need to be done. Here are some pictures of the three framed sections...
And here it is in it's new space...
These pictures are before hinges were installed, as the tops will lift up for storage.
Here's a reminder of the space before...
And after...
Hubby went out of town this weekend, but before he left, I talked him into installing the hinges. Not sure if these will stay, I would really like to find some that are hidden. The guy at Lowe's told me these were the only ones that would work for what we're doing. I've searched the internet since then and I'm not convinced this is my only option.
Do any of you know if concealed hinges will work?
Hopefully we'll be trimming out the banquette and adding base molding tomorrow. I'm so excited to see it all come together! Surprisingly, it gives us more space to walk around, I didn't realize just how much space those chairs took up until they were gone.
While hubby's been away, I've been busy making a cute ruffled pillow I saw on Mimi's blog, Blue Roof Cabin. She gives a great tutorial on this and I decided to try it! We've needed an extra accent pillow on our master bed for some time now. I took some cloth napkins (a wedding gift from 11 years ago) and used them for my fabric.
I trimmed the fringes off and cut 2 napkins 13x17, as my pillow insert is 12x16. I had four napkins to work with and put two aside for the ruffled center. I cut two napkins 6 inches wide and 22 inches long to make two long strips. After sewing the sides to make a nice hem, I sewed them together to make a long 40 inch strip.
Once I had the two strips of fabric sewn together, I lined up my strip to the middle of the top piece and pinned the center.
The next step is to randomly pleat the center fabric, pinning down each pleat.
Once you've pleated and pinned, sew each side about 3/4" inside the finished edge. This will create a ruffled edge with your pleats down the middle. Place good sides together and sew all around (about 1/2"), leaving an opening to stuff your pillow.
Hand stitch the opening and you're done!
I just love it! It's the perfect addition and the color works great with the bedding!
Thanks to Mimi for the awesome tutorial!
Check out her blog and see what else this talented lady can do! She's very handy when it comes to building furniture! I'll be back soon to show another update on the banquette!
I'm linking up to:
Tuesday, July 05, 2011
Kitchen Banquette
Hi again! Hope you all enjoyed your 4th! Over the long weekend, my dear, dear husband started building us a kitchen banquette. I.AM.SO.EXCITED!!! We've been talking about this for months! We need extra seating when family and friends come to visit and more storage too. He's building them so that the bench seats lift up for storing my sewing machine, board games, school supplies, kid crafts, etc. Did I mention I'm excited? Here's our inspiration and the layout for our space.
via Remodeling Guy
I love the double pedestal oval table and bench too!
Angled banquette via Elements of Style
We're going for the angled look because of how the room is laid out. We won't have the elevated armrests, due to the window by the pantry. The first inspiration picture shows you how we plan on trimming out the banquette. Not a very good picture, but it's the only one I could find. Here's our space:
This is our current arrangement. The door on the left is our walk-in pantry and the other angle is next to the sunroom. The chairs stick out pretty far from the table and always nail me in the hip when I walk towards the pantry!
I found this trellis fabric @ Hobby Lobby in their basket of remnants.
It is normally $22/yd. For some reason they were selling 2 1/2 yards for $29!
I plan to upholster the bench seats with this!
My other find was this double pedestal table on Craigslist for $40.
I hope to use it in this space, once I give it a facelift, of course.
We'll see... if it doesn't work, I can always relist it!
Be back soon to show you updates on the banquette! :)
Monday, July 04, 2011
Sunroom in Sea Salt
Happy 4th of July everyone! Hope you are enjoying this three day weekend. Remember this cake recipe I posted back in May? I hope you've had a chance to try it! We've been so busy around here that I didn't have time this year.
We've been productive with long overdue house projects. Oh, and just to warn you... this post has lots of pics! First on the list was our dreadful sunroom with monkey and palm tree window treatments. It's been this way since we moved in seven years ago. Can you believe we've lived with it this long? We had a recent garage sale and I sold those babies (and those scrolly bar stools) to a lady that was thrilled to have them! Now that they are gone, the room already looks better!
Here's the room before I painted.
You can see where I tested another paint color, but found it to be too similar to the existing wall color. I'm so glad I decided on the fresh and airy look!
I've always loved Sherwin William's Sea Salt that Layla has used in her home. So light and airy and with all the windows, I knew it would look great in this room! It was the perfect time to buy paint too! SW was having a 30% off paints and stains sale, plus I had a $10 off your $50 purchase. I bought everything I needed to paint this room (paint, roller, tray and tape) for $43.21! Yay!Here's the room now! Sorry for the picture quality. It was dark and I was excited to post some pictures. I LOVE it! It's not even complete and I'm so thrilled with it thus far!
I was at TJ Maxx/Home Goods a few months ago and snagged these table cloths. Three of them in different lengths for $50 dollars, much cheaper than buying it at a fabric store. I've made window valances out of cloth napkins before and I have read where several of you have made faux roman shades and other treatments out of table cloths. I was up for the challenge! Aren't they gorgeous? Here they are with the new room color! I can't wait to see them when I'm finished!
Here's a close-up!
I saw this BHG picture on The Inspired Room's blog and would love to make the window treatments similar to this, only not inset because my windows aren't framed with molding. So pretty! I'm currently looking for a tutorial on these, so if you've seen one, please let me know! :)
I'm linking up to Pink Postcard's Transformations and Treasures
Subscribe to:
Posts (Atom)