Wednesday, May 18, 2011

Before and After: Metal Tile Transformation

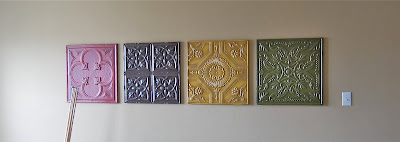
I'm excited to share one of my favorite transformations with you.  As I mentioned in a previously post, I purchased these four tiles at Kirkland's a few years ago.  At the time, they were the perfect colors for the room and went well with my window panels.  Well, let me just say... this girl needed a change.  In my opinion, the red was too bold for such a big room.  I wanted a more relaxing space, it's true what they say about color, it can go a long way toward setting the mood and energy in a room.
I knew I wanted to keep the tiles because of their size and style.  I've seen old architectural tiles at local antique shops and thought I could give them a similar look.  First, I started by priming the walls.  I needed to start with a clean slate to know just what color to use... that's how I roll.  My daughter helped me prime over the red... princess style!  :)
For the walls, I chose a beautiful grey blue by Behr called Silver Tinsel.  I love this color! It's the perfect shade! After two coats on all three walls, I knew painting the tiles an off white would make them pop! Helpful tip: When painting over red (or any dark/bold color), use a tinted primer that is 70% of your new wall color.
I scuffed up each tile with a 220 grit sand paper to help the primer stick.  Then, I gave each one 2 coats of Sherwin Williams Dover White.  I decided to distress them to give them that shabby vintage feel.  I took a rag and put my beloved Ralph Lauren Smoke glaze all over, then whipped it off.  Are you ready for the before and after?  Okay, one more time...  Here's the before:
And the after:
The room is still a work in progress, but toning down the walls with a more relaxing color made a HUGE difference. I'll give you a peek of how it looks now (minus the Christmas tree, of course).  I haven't done anything but hang panels.  Stay tuned to see what I plan to do with this room!
On a recent trip to Goodwill, I discovered this clock for $3 dollars!  I've been searching for a wall clock for our master bathroom.  I love the detail!  Come back and see what I did with her!  Hope you're having a great day!
Monday, May 16, 2011

Flower Mirror

Happy Monday to you!
So I promised a post about some projects I've done in our home and can't wait to show you what I did with this round mirror I found at Hobby Lobby for 50% off!  Woo-Hoo!
We're using the nursery furniture in our daughter's room, it's very gender neutral, so part of it is still in our son's room.  We purposely purchased two dressers so we could split the set for the two kids.  The dresser we moved out of the nursery did not have a mirror, so I knew once I found the perfect one I'd give it some girlish charm.

Her room has a floral theme - Pottery Barn Kids "Mallory," so I knew exactly what I wanted to do with this mirror as soon as I saw it's shape and size.  After spray painting her with Krylon's "Ballet Slipper," I centered her above the dresser.  Then, I took some 12x12 sheets of card stock and cut random petals for my template, making sure the petals were the right size for the mirror.
I placed them around the mirror with tape and began tracing each one until I liked the spacing.  Then with my coordinating paint, Valspar's High Noon, I began painting each petal, using my pencil lines as a guide.  I kept the mirror in place as I painted each petal, so as not to lose the center.  You'll have to forgive my lack of pictures, I'm still new at the whole "document as I go" process.  :)
And here she is!  I'm so thrilled with the outcome!  The mirror ties in with the bedding and is the perfect finishing touch for the room.  I've searched for a picture of the bedding and unfortunately do not have one available.  The lamp shade shows you the fabric that inspired me.

I hope to create a gallery wall of pictures and her art on the adjacent wall.  I've been collecting frames of different sizes at my local thrift shops.  As soon as I complete my collection, I'll be posting the reveal.  Thanks for stopping by and hope you have a great week!

         I'm linking up to the Home May'd spray paint party at Thrifty Decor Chick
I love your feedback.  Let me know what you think!

Saturday, May 14, 2011

Sneak Peeks...

Hope you all are having a great weekend!  It's in the mid-70's here, perfect weather for doing some much needed yard work!  I wanted to share a few pics with you, to give you some insight as to what I'll be posting in the following weeks.
Here is a mirror I found at Hobby Lobby for 50% off!  She was a steal at $12!  I know, not very exciting right now, but stay tuned to see it's new makeover and where her new home will be!  
This is one of four tiles I purchased at Kirkland's several years ago that no longer work in my home.  Their colors were gold, brown, red and green.  They worked well when the room shared those colors, but I have since gone in a new direction and they needed a change!  I love the designs of each tile, so I knew with a little sanding, painting and distressing they would be perfect!  A few of my friends have the same ones and have asked me to help them revamp theirs too!  Stay tuned to see what I did with these beauties!
Well, I'm off to do some more yard work while the little one is snoozing.  Hubs and I are taking turns doing outdoor chores and entertaining the kids.  It's my turn to dig in the dirt! Be back soon to share my reveals!

Thursday, May 05, 2011

Let's Get To Bloggin'!

Now that I have this blog thing underway, I'm so excited to share the many projects I've been working on.  Projects relating to painting, building storage, revamping and my latest Craigslist find!  In the next few weeks, I hope to share my ideas, inspirations and my works in progress.  Stay tuned...

Saturday, November 20, 2010

Holiday Shopping Madness...

Can you believe it's that time of year again? It snuck up on me last year; I didn't feel like I was really able to enjoy it. Call me crazy, but I think we even left the tree up until mid February because we put it up the week before Christmas.
I discovered blogging late last year and it opened up a whole new world of possibilities! I was inspired by so many of you! Ever since, I've been waiting for this time of year to come! Last year, a friend and I vowed that we would make this year more relaxing by starting early! So far, so good! I have completed almost all of the Christmas shopping and it's not even Thanksgiving yet! Woo-hoo! That's a record for me! My hope is to get the tree up in the next few days. The in-laws are visiting us for Thanksgiving and my MIL is very talented with tree decorating.  I'm hoping she can do her magic on my tree.  She always has such a beautiful tree every year! I went to Canton (crafters paradise!) with a friend a few weeks ago and purchased some metallic bronze mesh, I love the look and think it will help make our tree look nice and full!
Every year, I love to find my gift wrap at The Container Store.  They have such a beautiful selection, it's hard to pick just one. I fell in LOVE with this pinecone paper. Picture this... metallic bronze background with white glitter pinecones and silver branches!  Oh my, it's just stunning!  This paper has gotten me in so much trouble! I never thought of putting those colors together! The combination is just GORG! So, what is a girl to do?  Drive over to the local HobLob and pick out some el cheapo ornaments, of course! Half off, baby! YAY! I found these vintage inspired silver and bronze ornaments for $2 dollars each ($4 before discount)! Last year, our tree was just metallic bronze, so I was super excited to see what this would look like! I'll keep you posted as to the progress we make. It's such a huge relief to have most of the shopping finished. I'm not a huge fan of fighting those mall crowds. I'm a fast pace walker and I go a little crazy when I get stuck behind someone going at a snail's pace. "Out of my way, I'm on a mission!" LOL! I work retail and have to endure Black Friday this year!  And it WILL be crazy! The perk of working BF, is being able to snag up some deals before the public! Now that's my idea of shopping!
Here's a picture of our tree!  I loved how it turned out!

Alicia
Related Posts Plugin for WordPress, Blogger...