Showing posts with label Recipes. Show all posts

Thursday, January 26, 2012

Homemade Ranch Dressing

Hi again!  We've been getting buckets of rain the last couple of days.  We needed it, as we've been on a water restriction for several months.  It would have to rain everyday for a month before they lift it.  Anywho... I came across this yummy ranch recipe and had to share it with you.  I was watching Chuck's Day Off on the Cooking Channel over Christmas and wrote the recipe down in my daughter's coloring book, the closest thing I could find.
This is what you need...
1/3 cup of mayo
1/3 cup of sour cream
1 tbsp of honey
juice of 1/2 a lemon
1/2 tsp of fresh garlic (1 clove)
1 scallion, finely chopped
coarse salt and freshly ground pepper to taste (I used table salt)

Combine all ingredients together in small bowl and serve!
Keeps in refrigerator for up to 5 days.
It's a different twist on ranch.  The honey and lemon juice make it tart and sweet.
My kids liked it!
Let me know if you try it and you like it!

Look what the guys in brown delivered yesterday...
So excited!  I ordered it on Sunday and it came Wednesday!  Wish me luck on turning that (^) into this...


I know what I'll be doing during nap time!  :)

I'm linking up to:

Home Stories A2Z
Funky Junk's Sat Nite Special

Monday, December 05, 2011

Gruyere Grilled Cheese With Caramelized Onions

This post will have you running to the store for these simple ingredients.  It's the perfect grown-up comfort food!  I first stumbled upon Gruyere cheese when I was watching The Nate Berkus Show and he featured The Neely's holiday recipes.  Their "Best Mashed Potatoes" were quick and easy, so I decided to add it to our Thanksgiving menu.  Their recipe on Nate's site calls for smoked gouda, but when I watched the actual show, they used Gruyere.  Their mashed potatoes were easy and delicious, just like they said!  I had some cheese left over, so I googled Gruyere and found this recipe from Tasty Kitchen.
Source: Tasty Kitchen via Alicia on Pinterest

Ingredients:
2 Tablespoons Olive Oil, divided
1 whole Small Sweet Onion
1 pinch of salt
1 pinch of sugar
4 slices Whole Grain Bread
4 slices Gruyere Cheese

Preparation Instructions:
Heat one tablespoon of olive oil in a skillet over medium heat.  All the sliced onion and sprinkle with salt and sugar.  The sugar is to help with the caramelization and the salt sweats the onion out a a bit, as well as balances the sugar.  Cook, stirring frequently, until the onions are browned, about 20-25 minutes.

Take two pieces of bread; line one side with sliced cheese.  Then distribute some onions over top and top with the another piece of bread.  Brush the outside pieces with olive oil (I used Pam Olive Oil spray, so much easier!)  I recommend placing another pan on top of the sandwich in order to squash it down a bit. Cook the sandwich until the bread had browned, about 2-5 minutes.  Flip over and repeat.  Transfer to a plate and dig in!

This is SO delicious!  I think I made three in one week!
Here's my festive sandwich...
Have you made this?  Do you love it, like it, not like it?
I'd love to know what you think!It's been "repinned" several times on Pinterest,
so I'm thinkin' it's a favorite!  Have a great week!

Linking Up To:
Tuesday Talent @ Vintage Wanna Bee

Tuesday, May 24, 2011

Beef Jerky Marinade

This is a HUGE favorite around our house... even our kids ask for it!  My hubby has been searching for a dehydrator for quite some time now (he likes to do plenty of research before purchasing) and surprised us with an Excalibur Dehydrator. Even before we got it, he was out there on the "world wide web" searching for a jerky marinade and knew that Food Network's, Alton Brown, host of "Good Eats" would not disappoint!

So, without further ado, here's the "oh so yummy" recipe:

1 1/2 to 2 pounds flank steak (we have also used a thin cut sirloin tip or milanesa)
1 cup Worcestershire sauce
1 cup soy sauce
2 tablespoons of honey
2 tsp. onion powder                                          
2 tsp. garlic powder
1 tsp. crushed red pepper
1 tsp. fresh ground pepper
2 tsp. liquid smoke

Here's a few packaging labels of the meats we've used...


Place an opened gallon sized zip-loc bag into a quart size plastic container and fold the tops of the bag over to hold bag in place.  Combine all but the steak into bag and stir with a whisk.  Set aside.

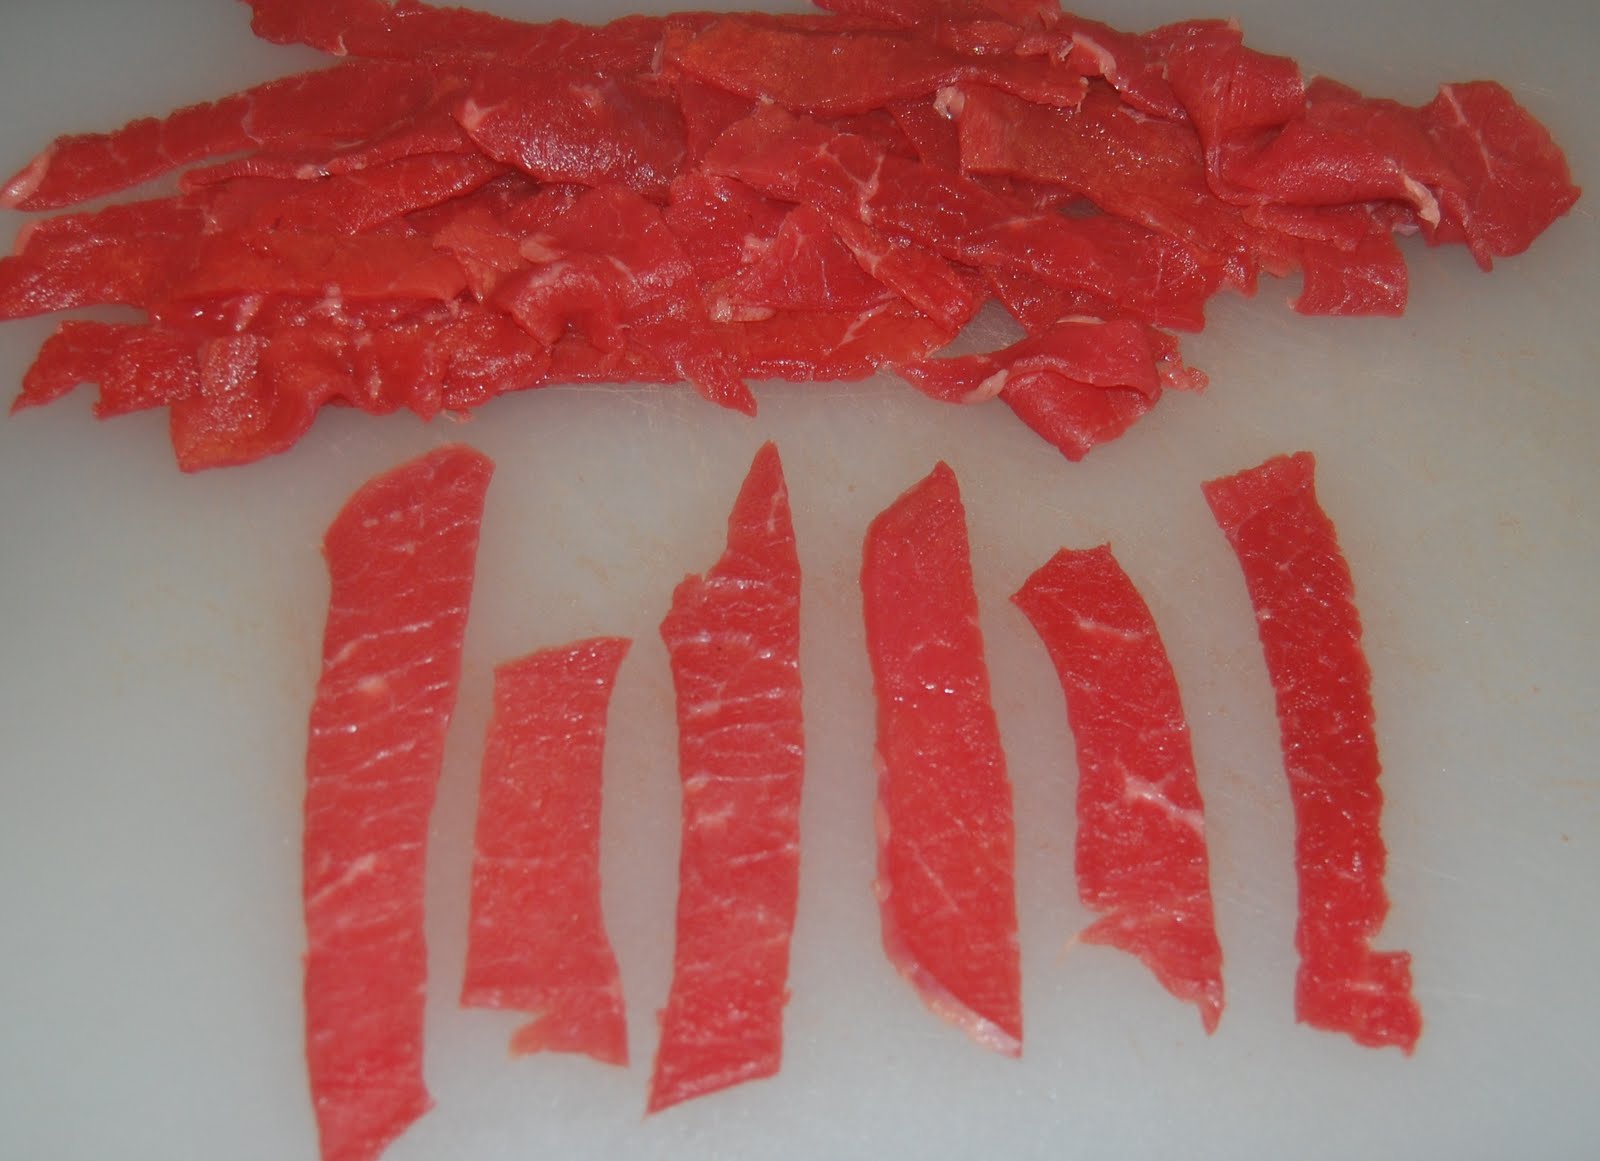
Trim the flank steak (or in our case thin cut milanesa) of any excess fat and cut steak into strips, about half an inch or more thick.  Place all trimmed and sliced meat into your zip-loc bag, seal and make sure all meat is covered.


Place your marinated bag of meat in a pyrex dish, refrigerate and marinade for up to 24 hours.  Least amount of time can be 6-8 hours, but we like ours nice and flavorful!
Note:  Be sure to turn your meat every so often so all meat is well marinated.


After it's marinated for the desired time, line cookie sheets with paper towel and take marinated steak out of bag.  Blot excess juices off the meat and place on your dehydrator trays, spaced evenly so strips aren't touching.  Once you have all your meat on trays, sprinkle some freshly ground pepper over top (optional) and place in the dehydrator, turned to the beef jerky setting.


In about 4-6 hours (depending on the thickness of your meat) you'll have yourself some delicious homemade jerky!  Enjoy!
You'll find me at these parties:


I'm linking up to Rhoda's Home May'd Recipes Link Party!  

Fourth of July Flag Cake

I first saw this cake on Sarah's blog and knew I had to give it a try!  Elissa at 17 and Baking (and her father) are the creative genius' behind this beautiful cake.  


Since I was trying this for the first time (and wasn't sure if it would turn out), I used a basic white cake mix and poured it into three 9 inch round cake pans.   


The recipe directions are per Elissa at 17 and Baking...
To make the cake, you use three layers of white cake.  Using food coloring, one layer is dyed blue, one red and the last layer is kept white.  The three layers are leveled so they are all the same height.  Each layer is about 2 inches tall.

Using a serrated knife or cake leveler, slice the red and white layers horizontally in half. So you have a blue layer (2″), two red layers (each 1″), and two white layers (each 1″). Set one white and one red layer aside, those will be the bottom two stripes of the flag.


You only want a square of blue in each slice, not an entire layer. Stack the blue layer, white layer, and red layer on top of each other. Using a serrated knife, cut a large circle through all three layers. I used a bowl as a guide. Now you have a ring of blue (2″), a ring of white (1″), a ring of red (1″), and three inner circles in each color (the blue is 2″ and the other two are both 1″).  Save the inner circle of blue and the outer rings of red and white.  I'll explain why in a minute...


To assemble the cake, frost the bottom two layers together – set the uncut white layer on a plate and spread with frosting. Top with the uncut red layer. Spread the uncut red layer with frosting, then set the blue ring on top. Use a spatula to spread a very, very thin layer of frosting around the inside edge of the blue ring. This will help keep the blue layer and the two top stripes together.


Place the white inner circle on top of the uncut red layer, inside the ring of blue. Frost, and top with the red inner circle. Frost the entire cake and voila, it’s a flag cake!


So, back to why you keep the parts you cut away.  Once you cut the layers, there is quite a bit of "waste" involved with this cake.  Don't throw it away!  You can save it for serving with ice cream, making a layered cake trifle with whipped cream and berries!  Be creative!  :)


Okay, now for the frosting... the best part!  When making the frosting, the cream cheese can actually be used straight from the fridge, no need for it to be at room temp!  Here it is, plain, but the flavor combinations are endless… add zest or juice or grated ginger or extract or whatever you’d like! 
For the frosting:

16 oz. cream cheese
10 T. unsalted butter, at room temperature
4 t. vanilla extract
4 c. powdered sugar, sifted

Place the cream cheese, butter and vanilla extract in the bowl of an electric mixer. Cream together until well-combined and fluffy. Gradually add the powdered sugar, mixing very well to combine and make a smooth frosting.

The frosting can be made a day ahead and stored in an airtight container in the refrigerator. Be sure to allow enough time for the frosting to come to room temperature before using.

The best part about the frosting is that you can use cold cream cheese... straight from the fridge!  Here it is, plain, but the flavor combinations are endless… add zest or juice or grated ginger or extract or whatever you’d like!  


It turned out great and it is so delish!  Now, if you don't mind, I've attached several pictures of this patriotic masterpiece!  My family and I LOVE fruit so I donned her with raspberries and blueberries!  YUM!  Hope you try it out! 


I'm linking up to Rhoda's Home May'd Recipes Link Party!  


Related Posts Plugin for WordPress, Blogger...